CentOSでユーザー作成とパスワード設定
今更だけどLinuxでのユーザー作成をおさらい。
環境
CentoS6
手順
普通に作成するなら。
ユーザー作成
ユーザー作成
useradd hoge
home直下にホームディレクトリが作成される
ls -lhtd /home/hoge/
drwx------. 4 hoge hoge 4.0K Jan 19 14:30 /home/hoge/
既に存在してるディレクトリをホームディレクトリに指定してユーザー作成をするなら。
※存在しないディレクトリを指定
useradd test2 -d /tmp/test2/
存在してるディレクトリを指定すると警告が出る。
useradd: warning: the home directory already exists.
Not copying any file from skel directory into it.
useradd実行するとホームディレクトリも作成される
ls -d /tmp/test2/
/tmp/test2/
パスワード設定
passwd ユーザー名
短かったり簡単なパスワードだと警告が出る
BAD PASSWORD: it is too short
BAD PASSWORD: is too simple
VMwareのCentOS6でNICを追加して固定IP設定を行う
環境
VMware
CertOS6
手順
元々のネットワーク
[root@lb01 ~]# ifconfig
eth0      Link encap:Ethernet  HWaddr 00:0C:29:B2:B1:23
          inet addr:192.168.10.10  Bcast:192.168.10.255  Mask:255.255.255.0
          inet6 addr: fe80::20c:29ff:feb2:b123/64 Scope:Link
          UP BROADCAST RUNNING MULTICAST  MTU:1500  Metric:1
          RX packets:57 errors:0 dropped:0 overruns:0 frame:0
          TX packets:63 errors:0 dropped:0 overruns:0 carrier:0
          collisions:0 txqueuelen:1000
          RX bytes:7486 (7.3 KiB)  TX bytes:6412 (6.2 KiB)

lo        Link encap:Local Loopback
          inet addr:127.0.0.1  Mask:255.0.0.0
          inet6 addr: ::1/128 Scope:Host
          UP LOOPBACK RUNNING  MTU:65536  Metric:1
          RX packets:96 errors:0 dropped:0 overruns:0 frame:0
          TX packets:96 errors:0 dropped:0 overruns:0 carrier:0
          collisions:0 txqueuelen:0
          RX bytes:6080 (5.9 KiB)  TX bytes:6080 (5.9 KiB)
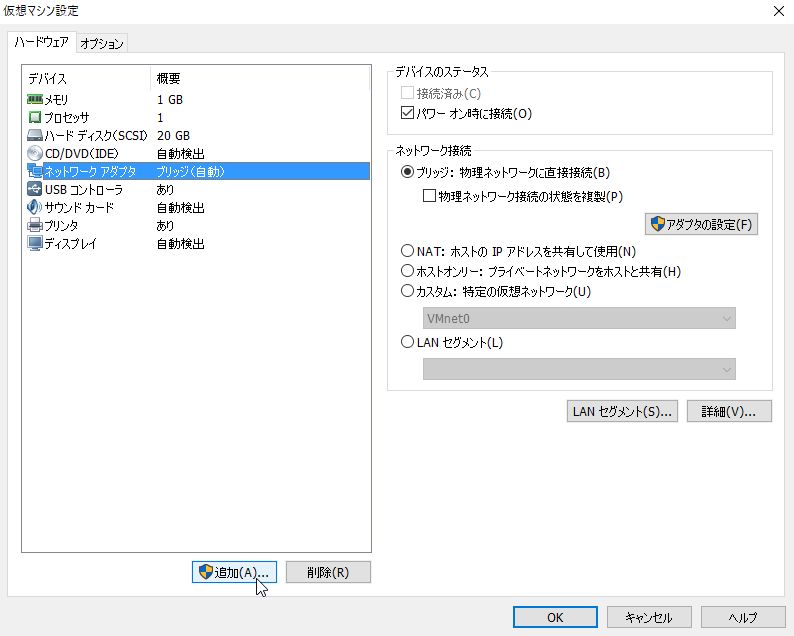
NIC追加したい仮想マシンの設定を開く。
元のネットワークアダプタの設定は「ブリッジ(自動)」。

追加をクリック
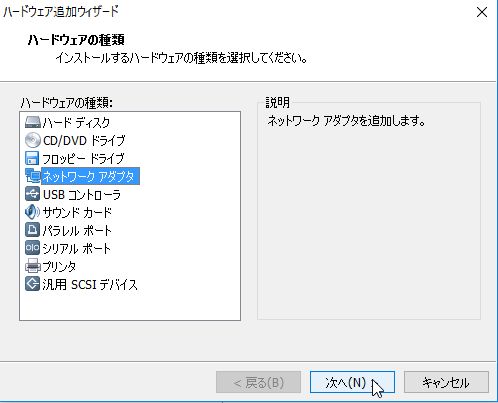
ネットワークアダプタを選択し「次へ」

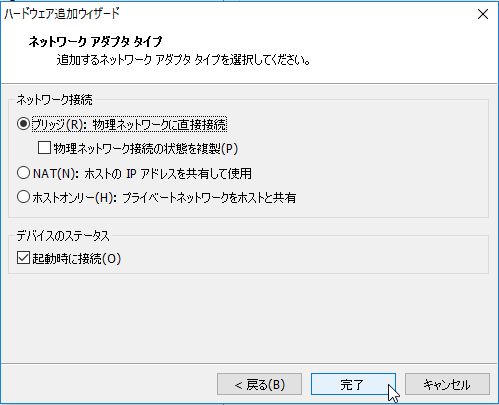
ネットワーク接続でブリッジを選択し完了。

こんな感じになる。

新しいネットワークインターフェイス「eth1」が追加されている事を確認。
[root@lb01 ~]# ifconfig
eth0      Link encap:Ethernet  HWaddr 00:0C:29:B2:B1:23
          inet addr:192.168.10.10  Bcast:192.168.10.255  Mask:255.255.255.0
          inet6 addr: fe80::20c:29ff:feb2:b123/64 Scope:Link
          UP BROADCAST RUNNING MULTICAST  MTU:1500  Metric:1
          RX packets:57 errors:0 dropped:0 overruns:0 frame:0
          TX packets:63 errors:0 dropped:0 overruns:0 carrier:0
          collisions:0 txqueuelen:1000
          RX bytes:7486 (7.3 KiB)  TX bytes:6412 (6.2 KiB)

eth1      Link encap:Ethernet  HWaddr 00:0C:29:B2:B1:2D
          inet addr:192.168.10.120  Bcast:192.168.10.255  Mask:255.255.255.0
          inet6 addr: fe80::20c:29ff:feb2:b12d/64 Scope:Link
          UP BROADCAST RUNNING MULTICAST  MTU:1500  Metric:1
          RX packets:12 errors:0 dropped:0 overruns:0 frame:0
          TX packets:8 errors:0 dropped:0 overruns:0 carrier:0
          collisions:0 txqueuelen:1000
          RX bytes:2310 (2.2 KiB)  TX bytes:1152 (1.1 KiB)

lo        Link encap:Local Loopback
          inet addr:127.0.0.1  Mask:255.0.0.0
          inet6 addr: ::1/128 Scope:Host
          UP LOOPBACK RUNNING  MTU:65536  Metric:1
          RX packets:96 errors:0 dropped:0 overruns:0 frame:0
          TX packets:96 errors:0 dropped:0 overruns:0 carrier:0
          collisions:0 txqueuelen:0
          RX bytes:6080 (5.9 KiB)  TX bytes:6080 (5.9 KiB)
続いてeth1のIPなどを設定します。
追加後、eth1のネットワーク設定ファイルは無いので作成します。
その前にNICの情報を確認します。
UUIDを確認。
※System行
[root@lb01 Desktop]# nmcli con list
名前                      UUID                                   タイプ            範囲     タイムスタンプ-リアル
System eth0               dbfb5e23-424f-42ea-ade1-de65051ddb4b   802-3-ethernet    システム 2017年01月16日 22時09分04秒
Auto eth1                 865abd20-9812-49f8-9071-27fb7882c3ae   802-3-ethernet    システム 2017年01月16日 22時09分04秒
System eth1               dbfb5e23-424f-42ea-ade1-de65051ddb4b   802-3-ethernet    システム しない
名前                      UUID                                   タイプ            範囲     タイムスタンプ-リアル
UUIDはNetworkManagerでの識別用らしく、NetworkManagerを使用しない場合は設定不要らしい。
続いてMacアドレスを確認
cat /etc/udev/rules.d/70-persistent-net.rules

# PCI device 0x8086:0x100f (e1000)
SUBSYSTEM=="net", ACTION=="add", DRIVERS=="?*", ATTR{address}=="00:0c:29:b2:b1:23", ATTR{type}=="1", KERNEL=="eth*", NAME="eth0"

# PCI device 0x8086:0x100f (e1000)
SUBSYSTEM=="net", ACTION=="add", DRIVERS=="?*", ATTR{address}=="00:0c:29:b2:b1:2d", ATTR{type}=="1", KERNEL=="eth*", NAME="eth1"
eth1用の設定ファイル新規作成
vi /etc/sysconfig/network-scripts/ifcfg-eth1
設定例
DEVICE="eth1"
BOOTPROTO="none"
HWADDR="00:0C:29:B2:B1:2D"
IPV6INIT="yes"
NM_CONTROLLED="yes"
ONBOOT="yes"
TYPE="Ethernet"
UUID="dbfb5e23-424f-42ea-ade1-de65051ddb4b"
IPADDR=10.0.10.10
#PREFIX=24
GATEWAY=10.0.10.1
NETMASK=255.255.255.0
DNS1=10.0.10.1
DNS2=10.0.10.2
参考までにeth0の設定
[root@lb01 Desktop]# cat /etc/sysconfig/network-scripts/ifcfg-eth0

DEVICE="eth0"
BOOTPROTO="none"
HWADDR="00:0C:29:B2:B1:23"
IPV6INIT="yes"
NM_CONTROLLED="yes"
ONBOOT="yes"
TYPE="Ethernet"
UUID="dbfb5e23-424f-42ea-ade1-de65051ddb4b"
IPADDR=192.168.10.10
#PREFIX=24
GATEWAY=192.168.10.1
NETMASK=255.255.255.0
DNS1=192.168.10.1
DNS2=192.168.10.2
ネットワーク再起動
/etc/rc.d/init.d/network restart
OS再起動
reboot
以下のように反映されました
[root@lb01 Desktop]# ifconfig
eth0      Link encap:Ethernet  HWaddr 00:0C:29:B2:B1:23
          inet addr:192.168.10.10  Bcast:192.168.10.255  Mask:255.255.255.0
          inet6 addr: fe80::20c:29ff:feb2:b123/64 Scope:Link
          UP BROADCAST RUNNING MULTICAST  MTU:1500  Metric:1
          RX packets:60 errors:0 dropped:0 overruns:0 frame:0
          TX packets:24 errors:0 dropped:0 overruns:0 carrier:0
          collisions:0 txqueuelen:1000
          RX bytes:4386 (4.2 KiB)  TX bytes:1554 (1.5 KiB)

eth1      Link encap:Ethernet  HWaddr 00:0C:29:B2:B1:2D
          inet addr:10.0.10.10  Bcast:10.0.10.255  Mask:255.255.255.0
          inet6 addr: fe80::20c:29ff:feb2:b12d/64 Scope:Link
          UP BROADCAST RUNNING MULTICAST  MTU:1500  Metric:1
          RX packets:22 errors:0 dropped:0 overruns:0 frame:0
          TX packets:52 errors:0 dropped:0 overruns:0 carrier:0
          collisions:0 txqueuelen:1000
          RX bytes:1886 (1.8 KiB)  TX bytes:2664 (2.6 KiB)

lo        Link encap:Local Loopback
          inet addr:127.0.0.1  Mask:255.0.0.0
          inet6 addr: ::1/128 Scope:Host
          UP LOOPBACK RUNNING  MTU:65536  Metric:1
          RX packets:30 errors:0 dropped:0 overruns:0 frame:0
          TX packets:30 errors:0 dropped:0 overruns:0 carrier:0
          collisions:0 txqueuelen:0
          RX bytes:2052 (2.0 KiB)  TX bytes:2052 (2.0 KiB)
他サーバーからPINGが通る事を確認
[root@localhost ~]# ping 192.168.10.10
PING 192.168.10.10 (192.168.10.10) 56(84) bytes of data.
64 bytes from 192.168.10.10: icmp_seq=1 ttl=64 time=1.47 ms
64 bytes from 192.168.10.10: icmp_seq=2 ttl=64 time=0.208 ms
[root@localhost ~]# ping 10.0.10.10
PING 10.0.10.10 (10.0.10.10) 56(84) bytes of data.
64 bytes from 10.0.10.10: icmp_seq=1 ttl=64 time=0.416 ms
64 bytes from 10.0.10.10: icmp_seq=2 ttl=64 time=0.197 ms
64 bytes from 10.0.10.10: icmp_seq=3 ttl=64 time=0.169 ms
64 bytes from 10.0.10.10: icmp_seq=4 ttl=64 time=0.173 ms
CentOSでエイリアスIPを設定する
現在のIPは
192.168.10.10
これに加え
10.0.10.10
で接続できるように設定する。
現在の設定を確認
[root@lb01 ~]# ifconfig
eth0      Link encap:Ethernet  HWaddr 00:0C:29:B2:B1:23
          inet addr:192.168.10.10  Bcast:192.168.10.255  Mask:255.255.255.0
          inet6 addr: fe80::20c:29ff:feb2:b123/64 Scope:Link
          UP BROADCAST RUNNING MULTICAST  MTU:1500  Metric:1
          RX packets:8908 errors:0 dropped:0 overruns:0 frame:0
          TX packets:4014 errors:0 dropped:0 overruns:0 carrier:0
          collisions:0 txqueuelen:1000
          RX bytes:1600962 (1.5 MiB)  TX bytes:427732 (417.7 KiB)

lo        Link encap:Local Loopback
          inet addr:127.0.0.1  Mask:255.0.0.0
          inet6 addr: ::1/128 Scope:Host
          UP LOOPBACK RUNNING  MTU:65536  Metric:1
          RX packets:77 errors:0 dropped:0 overruns:0 frame:0
          TX packets:77 errors:0 dropped:0 overruns:0 carrier:0
          collisions:0 txqueuelen:0
          RX bytes:4604 (4.4 KiB)  TX bytes:4604 (4.4 KiB)
[root@lb01 ~]# vi /etc/sysconfig/network-scripts/ifcfg-eth0
以下を追記
IPADDR2=10.0.10.10
NETMASK2=255.255.255.0
ネットワークを再起動
[root@lb01 ~]# /etc/rc.d/init.d/network restart
反映を確認
※ifconfigには出ないらしい
[root@lb01 ~]# ip addr show
1: lo: <LOOPBACK,UP,LOWER_UP> mtu 65536 qdisc noqueue state UNKNOWN
    link/loopback 00:00:00:00:00:00 brd 00:00:00:00:00:00
    inet 127.0.0.1/8 scope host lo
    inet6 ::1/128 scope host
       valid_lft forever preferred_lft forever
2: eth0: <BROADCAST,MULTICAST,UP,LOWER_UP> mtu 1500 qdisc pfifo_fast state UP qlen 1000
    link/ether 00:0c:29:b2:b1:23 brd ff:ff:ff:ff:ff:ff
    inet 192.168.10.10/24 brd 192.168.10.255 scope global eth0
    inet 10.0.10.10/24 brd 10.0.10.255 scope global eth0
    inet6 fe80::20c:29ff:feb2:b123/64 scope link
valid_lft forever preferred_lft forever他のサーバーから接続する為には、クライアント側でも同じセグメントのIPエイリアスを設定する必要があるので注意。
他サーバーからもIPエイリアスで接続できる事を確認
[root@localhost ~]# ping 10.0.10.10
curlではアクセスできない、何でだろう。要調査
CentOS7でfirewalldの代わりにiptablesを使用する
CentOS7ではファイアウォールはiptablesからfirewalldに変更されたようだ。
7系でもyumインストールすれば従来のiptablesも利用事は出来るとの事なので、iptablesを使用する事にした。
環境
firewolldの起動状態を確認。
Activeとなっており起動してる。
[root@localhost httpd-2.4.25]# systemctl status firewalld
● firewalld.service - firewalld - dynamic firewall daemon
   Loaded: loaded (/usr/lib/systemd/system/firewalld.service; enabled; vendor preset: enabled)
   Active: active (running) since 木 2017-01-12 22:09:24 JST; 2 days ago
     Docs: man:firewalld(1)
 Main PID: 609 (firewalld)
   CGroup: /system.slice/firewalld.service
           └─609 /usr/bin/python -Es /usr/sbin/firewalld --nofork --nopid

 1月 12 22:09:18 localhost.localdomain systemd[1]: Starting firewalld - dynamic firewall daemon...
 1月 12 22:09:24 localhost.localdomain systemd[1]: Started firewalld - dynamic firewall daemon.
firewalldを停止する
systemctl stop firewalld
systemctl disable firewalld
systemctl status firewalld
停止を確認
inactiveとなってる。
[root@localhost httpd-2.4.25]# systemctl status firewalld
● firewalld.service - firewalld - dynamic firewall daemon
   Loaded: loaded (/usr/lib/systemd/system/firewalld.service; disabled; vendor preset: enabled)
   Active: inactive (dead)
     Docs: man:firewalld(1)

 1月 12 22:09:18 localhost.localdomain systemd[1]: Starting firewalld - dynamic firewall daemon...
 1月 12 22:09:24 localhost.localdomain systemd[1]: Started firewalld - dynamic firewall daemon.
 1月 15 12:21:57 localhost.localdomain systemd[1]: Stopping firewalld - dynamic firewall daemon...
1月 15 12:21:57 localhost.localdomain systemd[1]: Stopped firewalld - dynamic firewall daemon.iptablesのインストール
yum -y install iptables-services
インストール確認
[root@localhost ~]# iptables --version
iptables v1.4.21
systemctl start iptables
systemctl enable iptables
起動してる事を確認
[root@localhost httpd-2.4.25]# systemctl status iptables
● iptables.service - IPv4 firewall with iptables
   Loaded: loaded (/usr/lib/systemd/system/iptables.service; enabled; vendor preset: disabled)
   Active: active (exited) since 日 2017-01-15 12:23:41 JST; 8s ago
 Main PID: 85483 (code=exited, status=0/SUCCESS)

 1月 15 12:23:40 localhost.localdomain systemd[1]: Starting IPv4 firewall with iptables...
 1月 15 12:23:41 localhost.localdomain iptables.init[85483]: iptables: Applying firewall rules: [  OK  ]
 1月 15 12:23:41 localhost.localdomain systemd[1]: Started IPv4 firewall with iptables.
iptables設定ファイルが生成されてる
cat /etc/sysconfig/iptables
# sample configuration for iptables service
# you can edit this manually or use system-config-firewall
# please do not ask us to add additional ports/services to this default configuration
*filter
:INPUT ACCEPT [0:0]
:FORWARD ACCEPT [0:0]
:OUTPUT ACCEPT [0:0]
-A INPUT -m state --state RELATED,ESTABLISHED -j ACCEPT
-A INPUT -p icmp -j ACCEPT
-A INPUT -i lo -j ACCEPT
-A INPUT -p tcp -m state --state NEW -m tcp --dport 22 -j ACCEPT
-A INPUT -j REJECT --reject-with icmp-host-prohibited
-A FORWARD -j REJECT --reject-with icmp-host-prohibited
COMMIT
80ポートを開放する為、下記を追記
※22番ポート開放の後ろの行に追加
-A INPUT -m state --state NEW -m tcp -p tcp --dport 80 -j ACCEPT
iptablesをサービス登録
[root@localhost ~]# systemctl enable iptables.service
[root@localhost ~]# systemctl list-unit-files | grep iptables
iptables.service                            enabled
iptables起動
[root@localhost ~]# systemctl start iptables.service
設定が反映されてる事を確認
[root@localhost ~]# iptables -nL
Chain INPUT (policy ACCEPT)
target     prot opt source               destination
ACCEPT     all  --  0.0.0.0/0            0.0.0.0/0            state RELATED,ESTABLISHED
ACCEPT     icmp --  0.0.0.0/0            0.0.0.0/0
ACCEPT     all  --  0.0.0.0/0            0.0.0.0/0
ACCEPT     tcp  --  0.0.0.0/0            0.0.0.0/0            state NEW tcp dpt:22
ACCEPT     tcp  --  0.0.0.0/0            0.0.0.0/0            state NEW tcp dpt:80
REJECT     all  --  0.0.0.0/0            0.0.0.0/0            reject-with icmp-host-prohibited

Chain FORWARD (policy ACCEPT)
target     prot opt source               destination
REJECT     all  --  0.0.0.0/0            0.0.0.0/0            reject-with icmp-host-prohibited

Chain OUTPUT (policy ACCEPT)
target     prot opt source               destination
適用後は設定したポートが開いてるか他のサーバーから確認。
※nmapが無い場合はyumインストール
[root@localhost ~]# nmap 192.168.10.111

Starting Nmap 5.51 ( http://nmap.org ) at 2017-01-15 12:29 JST
Nmap scan report for 192.168.10.111
Host is up (0.0000030s latency).
Not shown: 997 closed ports
PORT     STATE SERVICE
22/tcp   open  ssh
80/tcp   open  http
8008/tcp open  http

Nmap done: 1 IP address (1 host up) scanned in 13.04 seconds
参考
CentOSに日本時間設定する
CentOSに日本時間設定する
環境
CentOS6
手順
現在の日時確認
[root@lb01 ~]# date
2017年  1月 15日 日曜日 01:50:05 PST
実際は「2017年 1月 15日 日曜日 09:54:05」
約8時間ずれてる。
CentOSのタイムゾーンを設定しているファイルlocaltimeファイルに日本時間用ファイルを適用
[root@lb01 ~]# cp -p /usr/share/zoneinfo/Japan /etc/localtime
NTPサーバーのインストール
[root@lb01 ~]# yum -y install ntp
NTPサーバーの日付を設定
[root@lb01 ~]# ntpdate ntp.nict.jp
15 Jan 09:57:44 ntpdate[2389]: step time server 133.243.238.163 offset -32182.482955 sec
ntp.confの編集
[root@lb01 ~]# vi /etc/ntp.conf
「centos.pool.ntp.org」の行をコメントアウトし、「server -4 ntp 〜」の行を追加する。
#server 0.centos.pool.ntp.org iburst
#server 1.centos.pool.ntp.org iburst
#server 2.centos.pool.ntp.org iburst
#server 3.centos.pool.ntp.org iburst
追記
server -4 ntp.nict.jp
server -4 ntp1.jst.mfeed.ad.jp
server -4 ntp2.jst.mfeed.ad.jp
server -4 ntp3.jst.mfeed.ad.jp
ntpdデーモン起動
[root@lb01 ~]# /etc/init.d/ntpd start
設定後は、日本時間がずれなく表示されてる
[root@lb01 ~]# date
2017年  1月 15日 日曜日 10:00:36 JST
※2017年1月29日追記
上記設定は簡易版なので、NTPの設定は下記記事より。